How it works
Photos, videos, thumbnails, backgrounds, embedded players — including YouTube — get a mosaic the moment the page loads. Icons, logos, and buttons stay crisp so sites remain easy to use.
Double-click (double-tap on a phone) any picture to reveal just that one. Or hover for a 👁 Show button, or Alt+click — that one works even in fullscreen video. Your picks are remembered: a picture you revealed stays revealed on that site next time.
Separate strength dials for images and videos with a live preview. One switch shows everything on a site you trust — and a settings page lets you add trusted sites in advance and manage your picked pictures.
Turn it on for a site and pictures with no people in them show automatically — landscapes, products, backgrounds. Anything with any hint of a person stays pixelated, and videos never auto-show. The AI runs entirely on your computer: nothing leaves your browser.
Flip one switch and a YouTube video plays clear while the on-computer AI keeps a mosaic exactly over every person in the picture — lectures, tutorials, and reviews become watchable without watching anyone. Whenever the AI is warming up, unsure, or the scene just cut, the whole video is covered until it's sure again. Locked channels and Hardcore hours ignore the switch and stay fully covered.
An honest mirror, if you want one: how long on YouTube and on what subjects, and how long in AI chats and about what. It's a private tally kept inside your own browser — nothing is uploaded, there is no account and no server, and you can turn it off, export it, or erase it any time from the settings page.
Private by design
No account. No tracking. No server. Nothing about your browsing ever leaves your browser — the only thing stored is your own settings. Full privacy policy.
Get Pixelate
| Where | Status |
|---|---|
| Chrome / Edge / Brave (computer) | Download below — one-click Web Store install coming |
| All your devices at once | One setup code carries your settings everywhere — see below |
| Firefox (computer) | Download below — Firefox Add-ons listing coming |
| Android phones & tablets | Via Firefox for Android, once the Firefox Add-ons listing is live |
| iPhone / iPad | In the works — Safari version being built |
Install in Chrome — 4 steps, about a minute
Double-click Pixelate.zip. You get a folder called Pixelate Extension (plus a START HERE note with these same steps). Keep the folder somewhere it can stay, like Documents.
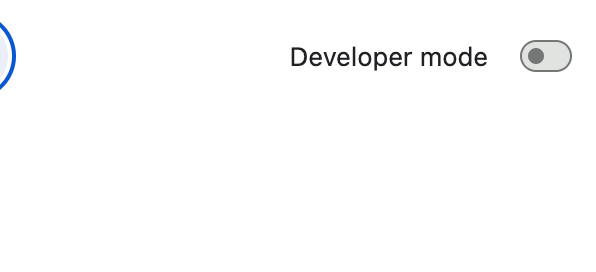
Type chrome://extensions into the address bar and press Enter. Then turn ON the Developer mode switch, top-right corner:
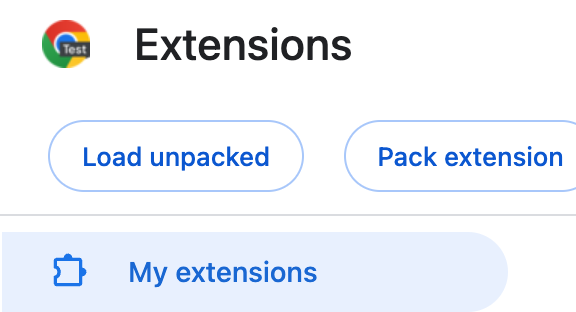
Click the Load unpacked button that appears top-left, and choose the Pixelate Extension folder:
A welcome page opens and everything is pixelated from now on. Double-click any picture to reveal it; the toolbar icon has your settings.
Why these hoops? Chrome only allows one-click installs from its Web Store — Pixelate's Web Store listing is on the way, and then this whole section becomes a single button.
Your other devices — set up once
Install Pixelate on your second computer or phone, then carry your settings across with one code. It works even when the two devices are signed into different Google accounts, and it works between Chrome and Firefox.
Open Pixelate's settings page (toolbar icon → All sites & my picks). At the top, under Your devices, click Turn on device sync. A short code appears.
Install Pixelate there, open the same settings page, click I already have a code, and type the code in.
The new device takes on everything — strengths, open sites, locked channels, Hardcore hours, day passes. From then on, a change on either one shows up on the other the moment you open Pixelate there — and within five minutes even if you don't.
Your settings are scrambled on your own device before they travel, using a key made from your code. The code never leaves your device, so nobody else — including us — can read your settings. Screen-time history stays on the device that recorded it and is never synced.
Firefox (computer)
- Download the Firefox package.
- Open
about:addons, click the gear icon → Install Add-on From File… and pick the downloaded file. - Firefox may require add-ons to be signed; in that case wait for the Firefox Add-ons listing — installs from there are one tap.
Common questions
Is it watching what I browse?
No. There's no account and no analytics, and nothing about the pages you visit ever leaves your browser. The one thing that can travel is your own settings, and only if you switch device sync on — and those are encrypted on your device first, with a key only your devices have. Privacy policy.
Will it slow my browsing down?
The pixelation is done by your graphics hardware, the same way sites do their own visual effects. On normal pages the difference isn't noticeable.
How do I turn it off?
Click the mosaic icon in the toolbar: one switch shows everything on the site you're on, one master switch covers everything. The All sites & my picks button opens a settings page where you can add trusted sites in advance. Removing it entirely: right-click the icon → Remove from Chrome.
A site looks broken or something's pixelated that shouldn't be
Double-click reveals any single item, and the per-site switch clears a whole site. If something looks wrong, email the address below — it usually gets fixed fast.